Showing posts with label tutorial. Show all posts

7 Oct 2017

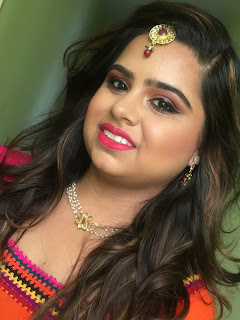
#Motd Decoding Karwa Chauth Makeup look


karwa chauth makeup look -indian festive makeup 2017

And the Festive Series continues...
So I didn't plan to make it a series but i am enjoying how everything is falling into place by itself and i am able to create a lot of looks for this festive season.So today's post is about Karwa Chauth makeup look which is falling on this Sunday 8th Oct. 
I created this look for my last class where i was teaching my students about Makeup which is apt for Karwa Chauth.Also if you are from Bangalore and wants to enroll for my Personal/Professional classes then do leave me an email at Vandanagandhir@gmail.com

So Let's Break down the makeup step by step.
Base:
I started off the Makeup using Mac Prep+Prime Natural Radiance primer to start off the base.I love this primer because it gives me a smooth base to work on with and it pretty much suits all skin types.


mac prep+prime Natural Radiance Primer

Foundation:  I used my trusty Mac Studio Fix Fluid foundation as a base in the shade NC-40 for her followed by Mac Studio Finish Concealer-NW35. It's a full coverage concealer which has plenty of shades so you will definitely get one for yourself! 
My model had round face so i added little highlight contour using the same studio finish concealer palette-Medium Deep.
I did set the base with Mac Select Sheer powder because the makeup is already heavy and select sheer powders are really lightweight.
indian festive makeup look -karwa chauth makeup 2017

mac studio fix fluid 

MAC Studio Finish Concealer

MAC Studio Finish Concealer Pallete-Medium Deep


MAC Select Sheer Powder


Blush: Because its festive season and we Indians love wearing shine, i added Mac Mineralise Blush in the shade Warm Soul and Mac Sheertone Blush in the shade Fluer Power and this Mix gave me a perfect pink sheen for the cheeks.
MAC Satin Blush-Fluer Power

MAC Mineralise Blush- Warm Soul
Highlight; Mac Mineralise Skinfinish- Soft & Gentle because we can never have enough Highlight!
MAC Mineralise skim finish- Soft & gentle
Eyes: 
Primer: PAC Eyebase no 4
Eyeshadow: Morphe Eyeshadow palette 34F which is perfect for fall and it contains such versatile colors that go with all skin tones.
I used All pinks & oranges shade from the palette which i have already highlighted in the picture for your reference.
Morphe 35F Eyeshadow Palette


Apart from that i also added Mac eyeshadow in Passionate for that pop of color in the crease. 

Eyeliner: Loreal Paris Liner Magique 
Kajal & Mascara: Sugar Twist & Shout Fadeproof Kajal with Sugar Lash Mob Mascara which is my ultimate favorite. It is Dark Black and provides intense volume.
Also, my model had such Amazing Lashes.

Lips: 
I kept the lips really matte and colorful. 
I used MAC Retro Matte Lipstick- All Fired Up with a Prolongwear Lip pencil- Trust in Red.


So that's how i created this gorgeous Makeup for This karwa Chauth for my model.
Let me know in the comments below your favorite products from the above & what you liked most about the makeup.
Enjoy the festive season and if you recreate the look don't forget to tag me in your Insta pictures.
you can follow me here- Bronzeblushbeauty 

14 Nov 2015

Ho To: smokey Eye Using Kajal Pencils|| Bronzeblushbeauty|| IndianYoutuber||


Hey Everyone!!
Thankyou for joining me here today!
What If I tell you that the kajal pencil lying in your bag is not just a kajal anymore?
I have a whole new different idea to use those pencils and do something really creative!
This sober brown smokey eye is hassle free and easy to create without messing around with eyeshadows!
Gather all your Kajal pencils in diffrent Colours and textures and watch this video to know how you can achieve this look!
 

Hope you liked this video and if you did then please hit the like button and show me some love :*
PLEASE SUBSCRIBE!
Share It With Your Friends And Family!
Because Sharing Is Caring!
Check out my last video here:

*************************************************
Check Out My Video on BRonzed Skn and winged eyeliner here:

***********************************************************************************************************************
Walk With Me To Sarojini Nagar , Delhi here

Check out Some Fall Makeup Inspiration!!
***********************************************************************
Find The Product List Below!

**** PRODUCT DETAILS ****

FACE:

Revlon Blush- Classy Coral
****************************************­***************************
LIPS:
Lakme Absolute Matte Lip Colour Apricot Rush
Benefit Cosmetics SugarBomb Lip Gloss.
****************************************­************************
EYES:
Rimmel Hide the Blemish Concealer as a Base.
SoulTree Ayurvedic Kajal _ 007 Rich Loam
Lakme Eyeconic Kajal - Brown
Sugar cosmetics Oh EYE told you so Eyeliner
Faces MagnetEyes Kajal

****************************************­*************************

1 Aug 2015

New Makeup Trend Alert!! STROBING Tutorial

Hey everyone!!
So its been a long time since i shared any tutorial on my blog and a few days back when i heard about something new trending nowadays on YouTube and Instagram which is called Strobing and i was like gosh i need to do this right nowwwwww and i wanted to do a video for this but for that i had to wait for some days which i couldn't so here i am with a blogpost sort of tutorial.
Trust me this post was saved as draft since a long time and I am finally posting it!
Lets start with what exactly it is!

23 May 2015

NightTime Skin Care Routine (Updated) ||How I Remove My Makeup


If you are a makeup junkie or wear minimal Makeup during the day or even if you don't wear makeup at all, Skincare still should be a Crucial Part of Your daily Routine. Make sure you always take out time for Your Beauty Regime Maximum of  10 min in the morning and 10 at night are enough!

30 Apr 2015

MOTD -Purple Smokey Eye With a Hint Of Gold + peachy pink lips.

Hello beauties.
Welcome Back to my blog.
If you are following my blog on  Regular basis then you must have known that I am working for lakme diva as a pro stylist and i have to do my makeup on regular basis along with coustmer's makeup so i thought of posting a whole blogpost containing all the product list i use to achieve the desire look.

26 Apr 2015

DIY- Tinted Moisturer /BB Cream ||Bronzeblushbeauy||


Hey girls!!
Its been a loooooong time since i have uploaded a post about something creative like a Tutorial or DIY.All i can see on my blog is reviews so i thought its a time to take a nap and do something different.
I was actually running out of my BB cream and i don't wanted to use foundations on my face because i want that light non makeup look using something very light so why not to share with you all!!
So Here We go...

22 Nov 2014

12 Nov 2014

31 Oct 2014

How I Do My Eyeliner +Basic Eye Makeup Tutorial


Hello all!!
How are you all doing??
Its been a long time (i Guess 2 weeks or more) since i posted any tutorial so i am back with One!!
I posted a picture of a very simple look with edgy eyeliner and a bold lip and many of you asked me how i did that so here i am explaining every step and it is actually a different look but the Eyeliner is same.
I did a very basic eye makeup and a bold eyeliner so you can actually go for any lip colour with this either a bold bright or a dark or even a neutral lip(according to your preference)


Step By Step Guide


So the first thing you wanna do is applying a primer all over your lids and i am actually just using a moisturiser because i wanted to see how my new eyshadows work without any eyeprimer.
And trust me a little amount goes a long way!
Then i took this shade from my new Makeup Revolution Nudes and smoked Palette and this is my base shadow (its a little lighter than my actual skin colour) and i applied it all over my eyes with this brush from Claire's and i buffed this shadow into my lid and browbone and i applied the same shadow on my lower lash line area too just to brighten the area!


Then i took a pencil brush and i applied a dark warm brown shadow onto my crease creating a sharp line as shown. (for those who don't know what is a crease - it is the area where our eyeball and browbone meets) and for those wo dont have a crease at all they can actually fake a crease by this technique i am using! just draw a line with a darker brown shadow as i did and blend it lightly upwards so that there is no harsh lines and hold the brush straight as i did or a little upwards then it is easier to blend!!


Then i took this shadow on my fluffy brush and make sure its clean and has no residue from the previous colour and i applied this light colour just above my crease colour to create a transition!

In the picture its actually looking like i have spreaded the shadow all over but it was just due to bad lightning -_- and that is the reason why i dont like to work in the evening time.so dont be confused because i have just blended the shadow up towards my browbone.

Then i am taking this colour (it seems like a pale champagne colour to me!) and i carefully applied it onto my lids only and to my browbone for a shimmery highlight.


Before Moving onto the main part i have some rules for you!! I usually don't follow or make rules when it comes to makeup but to make it easier for you i have to! And You also have to follow these rules! :D

Rules For A Perfect Liner Application 

1.Start with a Little product always and keep on adding if you need to.

2.Work in small strokes.
And thats it for the rules!!


See how i started!!
I started by applying a thin line from the outer corner of my upper lashline (i am not joining it to my lower lashline) and i created this line using small strokes!! Do not try to create line at once because that wont be perfect then.

Then i pulled my wing back and as you can see its not that thick because i am following my second rule i am working in small strokes and making it thicker by adding little product at a time!

it is easier when you work with small product at a time because if you do any mistake you can correct it easily and you can see how thick you want your liner to be but if you add more at a time thats not gonna work and will look messy!

And i am thickning my liner from the outside corners (sort of making a triangle because i want the liner to be edgy and not a soft one) and then i came in onto my lids but i took it only halfway in and the inner half lid is empty.
If you have smaller or hooded eyes then this trick is for you because by leaving the half area blank your eyes look bigger and i don't have smaller eyes but still i am doing it because i like it that way!


And then i curled my lashes and applied a coat of mascara to my lashes!! i used Maybelline hyper curl volume express mascara on to my upper and lower lashes and i dont have any liner or kohl on my lower lashline and i went in with this creamy shimmer shadow from the same palette and applied it to my lower lashline using an angular brush and thats it for the eyes!!

Now you can pair this up with a light foundation or just a bb cream and whatever lip colour you like! And we are done!!


And sorry for a long post but I still dont have a YouTube channel and i want to explain every little step in depth which makes my posts so long!

And if you liked this then share it with your friends and family and if you recreate this then tag me in your pictures i would love to see your recreations and you can tag me on my Facebook page HERE and My Instagram HERE and i ll see you soon!!!

15 Oct 2014

Arabic Eye Makeup Tutorial!!


Hello girls!!
After shopping it was the day to get back to my work :D A few days ago i was just experimenting a look which is actually inspired by the beautiful and talented Maya Mia!! she is so amazing and i tried to do a look she posted 4 months ago (If i am not wrong!) and some of you liked that look and were asking to do a tutorial on the look so Here it is finally!!
So this was the look!


Without wasting Time lets just get into the tutorial!!
So i have done my eyebrows already and i have applied a base!


1. So i am starting with warming up my upper crease area and for this i am using the Catrice cosmetics Matte bronzer in shade light and you can use any warm brown eyeshadow and just apply on to your uppar crease area and a bit into the crease.

2.Next step is to take a purple eyeshadow (I am using vov eyeshadow in shade pure purple) and apply it to your outer V area! you can use any brush either a flat brush or a fluffy brush which i am using! just make sure you apply it to the outer V area only!

(You can even just skip this step too! Its just your preference because we are going to put some more colours over it and i was just preparing the outer area for the next darker colour)

3.Now take a Pencil brush or a clean blending brush and just blend around the edges.

4.Next take the black eyeshadow (Here i am using the Matte black eyeshadow no 391 from inglot) and just go over the purple eyeshadow!
Make sure you aren't disturbing the crease colour

Then again take a clean brush and just blend around the edges!


5.Next i am taking the silver eye pencil and apply it on the rest of the lid where i haven't applied anything yet! (Here i am using Nyx slim pencil in shade 906)
And i know its looking a bit messy but all the magic is in the blending!
I blended this with my ring finger very softly and in between the shadows too!


6. Next i took a white shimmery eyeshadow and applied over the silver base! Apply the same shadow onto your browbone for a highlight.

By applying a base beneath it helps the shadow to stay longer and glitters can be chunky sometimes and have a lot of fall out so its better to go for a base first! And when you work with glitters try not to sweep these onto lid instead just pat it on

7.Again blend very lightly where the two shadows meet so that everything is clean and blended and doesn't looking messy or patchy!
8. Next i applied my eyeliner extended a little wing! And i go on the bottom lashline with the same eyeliner (I used maybelline gel liner because you can use it on your eyelids and inside the eyes too)
If you aren't comfortable using gel eyeliners you can go for whatever you are comfortable with!!

9. Next apply two coats of mascara (I used maybelline hyper curl mascara)


10.this is not the end because this is the time when we see if there is anything which isn't blended or do we have to put some shadows on again because in the process of blending its normal we take some shadows out! So juat fix all that!
I again applied the same bronzer just to warm up the crease a little more!!
And now here are the final results!!


I hope you enjoyed this post and if you recreate this look then tag me in your pictures on FACEBOOK and INSTAGRAM and leave any comment or suggestion or anything in the comment section below!!
And I'll see you soon :)

8 Oct 2014

How To Neutral Glowy katrina's Makeup Look.


Hello girls!!
So how many of you just love that healthy glowy and dewy looking face??

Three days back i posted a picture of a look that i created which was actually inspired by katrina again but it actually came out a little different though ! but i liked that so much so i thought lets just do it!!

And i became more happy knowing you guys liked it too and were asking how to do it so as i promised here is the tutorial for that look!!

So the key for this look is to keep makeup minimal and subtle yet dewy and glowy which gives a healthy glow.

Here is a little trick that i learnt from one of my favourite youtuber and Makeup Artist (gossmakeupartist) that only set your foundation at your T Zone and leave rest of the face as it is because when that foundation mixes with the natural oils of our face it become that dewy and glowy!!

But if you are using a foundation that sets to a powder finish like the latest one from L'Oréal paris magic nude liquid powder foundation then this trick might not work for you! because these kind of foundation generally sets to a powder finish and dont need anything else to set these so it might not work. I am not sure because i haven't tried it but just giving you an idea!

I have done my foundation as usual and i am not setting any area of my face right now and will apply a compact powder after finishing the rest of my makeup.

Moving onto eyes
1.first thing i am going to do is applying a base all over! You can use any primer or concealer and apply it all over your lid upto your browbone.
2. Then i am taking a nude eyeshadow and just going over that concealer because sometimes concealer / primer can be sticky and your eyeshadows wont blend on a sticky base!
3.Now just line your upper lashline with a black kohl pencil. U don't need to be perfect at this stage because we are blending it in a second. Apply the same kohl pencil to your upper rim of the eyes.
4.with the help of a smudger brush i am just smudging the kohl and even using my fingers to blend well so that there is absolutely no harsh lines. Make sure you aren't going too far because we are gonna be applying other color to the rest of the eye.
5. Taking an eyeshadow applicator(even a small paddle brush will work) i am just applying a black eyeshadow over it. Just do it very lightly and again blend. And when i say blend it means blend blend blend!!! Its the key to a flawless makeup!!


6.Apply a brown eyeshadow with the help of a blending brush of your choice on the rest of your eyelid which isn't covered by the black but don't go over your crease line because we aren't doing anything dramatic so keep your shadows in between this line.

7.Curl your eyelashes and apply one coat of mascara! Because its a subtle look i am not going over with my mascara. And eyes are done!

Now i am just setting my T Zone with a compact and applying a blush on to the apples of my cheeks and i am doing it in rolling motion and slightly taking towards my temples.
The blush i am using here is a peachy coral blush from revlon.
Ooooooo the fun part is coming! we are going to do a little highlighting i am using revlon highlighting palette in Peach glow and applying it on the cheekbone area (connect it with your temples) and a tiny bit on my nose and on cupids bow! I have a full tutorial on [How to Highlight Your Face bronzeblushbeauty26.blogspot.com/2014/09/howto-highlight-your-face.html]. You can click on the link to read full if you wish to :D


Lastly i am using a peachy nude lipstick and for this i am using a combo of two lip colors first i applied Faces Nude lipstick in Good Earth and then applied elle18 lipstick in pretty peach to get that in between shade! I just love this combo.
So here are the final pictures!!


I hope you guys enjoyed this tutorial and if you recreate this look then tag me in your pictures on FACEBOOK
And INSTAGRAM And see you all in my next post.
posted from Bloggeroid

3 Oct 2014

Katrina kaif Inspired Makeup from the Movie Bang Bang!!


Hello girls!!
So i am back with another post and yeah i am so excited this time because i have two tutorials for you and will be posting the other one right after this!

I was actually confused between katrina's two looks one is from her latest movie Bang Bang's title track and the other one is her famous all time Go to makeup look!!
She always keep her makeup look simple and subtle but classy at the same time. Even if she is wearing minimal makeup still she looks so stunning and gorgeous! And seriously i am so surprised that i am saying these words for her lol because i dont like her that much but i have started noticing that we have seriously so stunning makeup artist in the bollywood industry and i am loving whatever they do and learning from them!!
So first i am posting her look from the song bang bang in which she is wearing a cool toned dark blue sort of eye makeup and glossy pink lips!


Step By Step Guide
Step1 So i start off with applying my moisturiser and its very important to give your moisturiser and primer some time to set into your skin!! allow minimum 2 to 3 minutes or more and then move on to the next step! I used Neutrogena oil free moisture (for combination skin type)


Step2 I am not applying any primer and moving onto my foundation! and if you wanna check my foundation routine you can click HERE!! so i just took a pump of my Maybelline Dream liquid mousse foundation in shade nude light and i mixed it with a BB cream from ponds (because the Foundation has some cool undertones to it and i am kind of warm undertoned person) and applied it all over my face.

Step3 So the next step is concealing. I don't have blemishes right now but i just wanted to make my under eye area brighter so i just applied a concealer under my eyes and always start off with a little product and dont smear or drag your concealer just pat it on.

Step4 I am setting my under eye concealer with a powder. i want that area to look bright so i am using a light powder and actually i am using a matte eyeshadow, its from revlon colour stay shadow link in shade Bone.

Step5 for setting the rest of my face i am using my Maybelline clear glow fairness compact powder because in the above look she has no sheen on her face and its quite matte and this powder also gives a matte finish.

Step6 now moving on to eyes. She is having very defined blue eyes and its not blended and we can actually see the shapes n lines. So first i am using a base beneath. i am using my nyx slim eye pencil in shade no 906. Its actually a shimmer base silver pencil but i wasnt having a matte base so i am using this only and applying it all over my eyelid and going a little beyond my outer corner and taking it upto my crease line as shown in the below pic.


Next step is to fill it in. i am using a flat brush (its from colorbar and is good for those who just love patting on the eyeshadows!


Here i am using an old eyeshadow palette and it has a cool dark blue colored eyeshadow it was a little lighter so i first dipping my brush into the blue and then black and applying on to my eyelids.
Just go over the base we just created with our nyx base.
Next i am taking that eyeshadow called Bone from revlon and taking it onto a blending brush (again its from colorbar) and just blend around the edges very lightly because we actually dont want to see a blended look and want those lines to show! And apply the same eyeshadow onto your browbone too!
Moving onto the nexf step! Now adding some color to the lower lashline!
First i am applying a black kohl pencil to the lashline and i am only applying it to lashline not waterline.
Now taking a small pencil brush and the same blue eyeshadow i am smudging the kohl on the lower waterline.
Now again with the same eyeshadow called Bone i am just blending around the lower lashline.


Now apply very thin layer of your liquid liner (as thin as you can) and apply two coats of your mascara! And we are done with the eyes.
For the lips i am using a combo of a lipstick and a glossy pink chapstick from nivea. first i applied the lipstick its from elle18 called Wow pink and i wish i have applied it a little lighter but.. Sometimes its not your day! And then i applied the nivea lip balm over it its called nivea pearly shine.


Last but not the least i am applying a matte pinky blush its from L'Oréal!


And we are done!!
These are the final pictures!!


I hope you guys enjoyed reading this!!
And if you have any comments, suggestions or requests just leave it in the comment section below or you can connect with me on my social networking sites here..
FACEBOOK and INSTAGRAM
And now working on the next post!! See you soon all!! till then stay happy!! and happy dussehra to all :*
See you in my next post :***
posted from Bloggeroid